Showing posts with label woolly. Show all posts

Monday, July 13, 2009

Two woolly monsters emigrate to Hawaii...

Here are some photos of the two woolly monster puppets I made to send to John Hankins (castlegardener) as part of the international animation co-op. They are provisionally called 'Dad' and 'Toddler'. I'm afraid the lighting and focus in the photos is not great - I took them in a hurry under yellowish a light with no flash.

The Dad is a little smaller than my usual puppets, and is about 10 inches tall, the Toddler is tiny, just over 4 inches tall, and had to be made using miniature crochet with a 1mm hook.


Both puppets have aluminium armature wire and epoxy putty armatures which I wrapped with polyfibre wadding stuck in place with Copydex latex glue (one of the most versatile mediums in the world). The skins are made of hand crocheted yarn, acrylic and wool/acrylic blend in the case of the Dad puppet, and very fine angora/lambswool blend for the Toddler. The armature for the father had to be completed in stages after certain parts of the woolly skin had been sewn into place, otherwise the hands would have been too big to pass through the 'sleeves' of the skin.

The mouths are felt replacements, and other details are made using buttons and fluffy pom-poms. As usual I used french knitting (done on a circular four-pin bobbin) for Dad's fingers, which are threaded over latex and wool wrapped wire fingers.

Sunday, April 12, 2009

Props, cheap LEDs and fuzzy boobs!

I just thought I'd post some photos of various props I've made over the last few weeks. Most of them are for the international animation co-operative set up by John Hankins (castlegardener).

The first few are some wooden toys made from wooden bits and bobs I had in my hoard of useful junk:


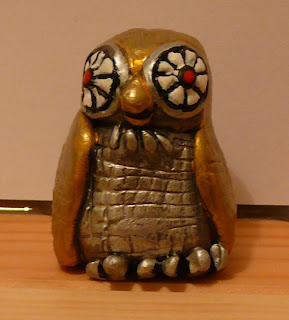
And this is my idea of what a Bubo (Clash of the Titans) bean-bag toy would look like. He's made of painted polymer clay:


And here's another silly stop-motion reference. Two plates with sheep on (ok, so I didn't 'make' them, I just drew on two plain doll's plates with Sharpie markers, then varnished them):


The other things I've been working on are some working table-lamps. I got an bargain on some ultra-bright LEDs in a variety of colours from a website called
http://www.phenoptix.co.uk/ who even sell blue and white LEDs for less than 14p each! That's ridiculously cheap, especially for those colours... I remember back when I was doing AS-level electronics in the late 90s, blue LEDs cost about £3 each and white LEDs hadn't even been invented... ahhhh, so long ago...

The website also sells great value resistors, which you need to prevent the LEDs being destroyed by the 9V circuits I wire them into. Great service too - if you need LEDs, I highly recommend them (they ship internationally too). The LEDs are really powerful (especially the white ones) and give a narrow 20 degree beam of light. They are so bright that I think I could probably use them as small spot-lights for lighting areas of my sets, which is great because they run for ages on a 9V circuit, they come in loads of colours, they don't flicker and they don't heat up!

Anyway, I used yellow LEDs in these two table lamps, to be placed in a sunny yellow coloured set. The lamps are made from glass beads and hollow wooden bases all glued together with epoxy. I soldered a 3mm yellow LED with a resistor into a circuit with a PP3 clip for a 9V battery, then covered all the exposed wires with heat-shrink tubing, with more heat-shrink over the top of that to turn the two seperate wires into one cable going from the lamp (the batteries will be hidden, obviously). I glued the LED into the bottom of the hole through the centre of the lamp, and put a 'plug' of tin foil fixed with epoxy into the hole at the top of the lamp to act as a reflector bouncing light back into the lamp.


I also made this lamp, to go in a set with a blue colour scheme, using a 3mm white LED. Most white LEDs give off a blue tinged light, and this one looks extra blue because of the blue glass in the lamp. It gives out about 3 times as much light as the yellow lamps, so I hope it won't be too overpowering!


Oh, and one last completely unrelated picture:


Yup, that's what woolly alien glamour model looks like, just in case you ever wondered...
It's for the cover of a magazine prop in 'Monday to Friday'.
If it arouses you (and you aren't a woolly alien yourself) you should probably be concerned!

Monday, March 16, 2009

Finally, some alien industral set photos!

At last, here they are, some photos of my woolly monsters in their finished alien technology set, ready to animate! The photos were taken using my new FZ50 and you can click on them to see the BIG versions on flickr:

wide shot

monsters 1

monsters 3

green monster

jungle monsters

It's probably best not to ask what the heck is going on in the last photo!

Sunday, February 15, 2009

Phyllis Pamplemousse

I can now reveal my most recent woolly monster toy, as it is now safely with its new owner Helen Gibbons (aka Shine). Helen is a incredibly talented fibre-artist and was a fellow 'intellectual rebel' when we were at high school together ('intellectual rebel' sounds better than trying to explain the chaos that was TEKAYL... eh Helen!). I made her a monster in exchange for a fantastic pair of hand-knitted socks she made for me, which are currently keeping my feet toasty warm.

Her special monster requests were:

Fierceness
Colours you can see from space
Lots of legs/tentacles
Lots of eyes


The result is the very toothy, seven-legged monster, Phyllis Pamplemousse:


Phyllis is pretty big (I forgot to measure her before I put her in the post, but I'd guess she's about 14" diameter) and her main body is made of crimson acrylic doubleknit yarn crocheted together with bright scarlet mohair to make a thick fuzzy fabric. The rest of her is made of acrylic doubleknit in dark purple, light violet, a golden yellow colour and black. The eye buttons are just a selection of buttons I already had in my button boxes, but finding the perfect buttons for teeth was a bigger challenge!

I knew I needed some big toothy looking toggles for optimum fierceness and set about trying to find some of those shark-tooth shaped toggles that you used to find on duffle coats, only to find that they must be the most out of fashion buttons in the world. After trips to Bury, Chorley and Bolton markets, numerous habedashery shops and lots of internet button suppliers, I could only find some ugly dark grey ones - not toothy at all. In the end, ebay came to my rescue and I found some flat bottomed white toggles that were even more perfect for Phyllis than the shark-tooth ones I had originally imagined!

Here is Phyllis' story:


Monday, January 26, 2009

Smaller and smaller....

Well I've managed it! I can now crochet with a 0.6mm hook (usually used for fine lace-making) and single thread wool yarn (more commonly used for weaving cloth). It's mainly my poor eyesight that makes it tricky, the actual action of crocheting is exactly the same as on a normal scale.


I made a tiny woolly bobble hat! It is about 19mm in diameter (60mm circumference) and 15mm tall (not including bobble). I used double crochet stitch (that's single crochet if you're American) for most of it and treble crochet (double crochet if you are American) to give it a ridged edging. It is 38 stitches around at the widest point. The tip of my (slightly scarred) index finger is in the photos for scale.
Here it is actual size (assuming you are viewing this the same size as I am).

I've worked out that if it is supposed to be an adult sized hat then it is between 1:10 and 1:9 scale. To be honest I think this is as small as I can go - once the stitches get smaller than 1mm square, my eyes can't cope anymore!

Sunday, January 25, 2009

Yarn heaven and mini crocheting...

Inspired by Emmyymme's recent miniature knitting exploits (plus the fact that I just treated myself to a full range of 21 crochet hooks ranging from 0.6mm -10mm), I decided to have a go at some miniature crochet. The first thing I made was a mini blanket. I used 2ply woollen yarn and a 1mm crochet hook.

So far it is about 13 cm square (about 5 inches) and I am going to finish it off by edging it in another shade of blue. I'm also going to make a mini 'granny square' patchwork blanket as soon as I get some more 2ply wool in different colours.


Next, I decided to make a miniature crochet monster:


She is 9cm / 3.5 inches tall (not including tufty bits) and her name is Delilah Axolotl (on account of her tufty 'gills' and the fact that axolotls are my new favourite creature after seeing one on QI last night). My usual woolly monster puppets are about 10-14 inches tall, so Delilah is small enough to be a doll for one of them.

I have not tried crocheting with single ply yarn and a 0.6mm hook yet. To be honest I'm not sure whether it's really necessary to go that small for my purposes - I'm never likely to work at 1:12 scale or smaller!

I have also discovered possibly the most amazing discount yarn supplier in the world. For anyone who likes doing any kind of needlecraft or textile work and can feasibly travel to Heywood (near Bury/Bolton in Lancashire, northwest England) - it is essential that you visit this place!
The shop is only open to the public on Fridays 10am - 5pm (other times by arrangement).

http://www.fairfieldyarns.co.uk/

They have an old Co-operative store which has two rooms literally full, from floor to ceiling, of thousands and thousands of part-cones and balls of surplus yarn in every variety imaginable. Wool, cotton, linen, silk, synthetic, metallic, mohair, cashmere, alpaca all in every thickness and colour you could imagine. I'd estimate that most of the cones have 200g-1kg of yarn left on them, and you pay for them by weight. At least half of the yarns are priced as low as 99p/100g!

They have even supplied Cosgrove Hall with yarn for mini-knitting of puppet costumes.

I bought a ball of black and a ball of white acrylic doubleknit (always handy), a cone of turquoise mohair (great for fuzzy monsters), a huge cone of burgundy pure wool doubleknit (or four-ply, it's hard to tell) and some periwinkle blue 2ply and single ply green wool for mini crocheting. The can of 7up is there for scale. I am going back again next Friday to get more colours!

Monday, August 18, 2008

New woolly monster puppets

Woohoo! I'm back in action after a week incapacitated by back pain. I managed to put my back out whilst I was asleep (no, I don't understand it either) and spent days unable to do anything but sit upright and perfectly still or lie flat and perfectly still - really useful. Thankfully I am now feeling much better although still a little delicate. It's slowed down my schedule a lot though, which is a shame.

Here are the two puppets for my next animation. Unfortunately Steeee isn't going to be able to write a script for me due to being a very busy man (no seriously, I don't know when he finds time to sleep). I have come up with an ingenious idea for the script (or lack thereof) myself. It will all become apparent when you see the animation...

Anyway, puppets:


Woolly monsters - my speciality. They are hand crocheted and have wire armatures. The purple one is made from a purple acrylic yarn crocheted together with magenta mohair so it has a fuzzy surface. The nature of fuzzy surfaces when animated is going to be used as a feature in this monster. The blue details are a mixture of acrylic and fuzzy polyester yarn. The green monster is a combination of bright green and mustard coloured acrylic yarns and a grassy green acrylic wool blend. The eyes are made of uncovered white plastic self-cover buttons (the ones that are designed to be covered with fabric) and the locking disks on the back of them can be used to secure the eyes in place. The pupils are black buttons attached with white-tack so they can be moved around. I have not made the replacement mouths yet, but they will be felt donut mouths.

Here are some photos of how they were made. First I crocheted the skin of the monsters. I find it easiest to make the skin first, then make the armature to fit. Each monster was crocheted as four sections: the head/body, a trouser shaped section and two arms. After I'd made the skin, I placed the segments together, drew round them and made an armature from aluminium arnature wire and epoxy putty to fit the shape, leaving plenty of room for padding. I didn't add hands to the armature at this point so that I could still thread the arm wires through the skin. The feet have flange-nuts inside the epoxy putty to act as tie-downs.


I padded the armatures with polyester wadding, usually used in quilting, glued to the wire with Copydex (latex adhesive) and fixed in place with fabric strapping, usually used in first aid.


Then I 'dressed' the monsters in their skins adding extra stuffing where needed, then added hands made of epoxy putty and wire. I wrapped the wire fingers and the wire antenna in Copydex and yarn to make them thicker and rubbery. I threaded short lengths of french knitting onto the fingers and this grips to the rubbery surface to stop it sliding around. Then I finished sewing on the arms.

Now I just have to make the mouths then on to building the set - expect excessive use of LEDs, resistors and pretend alien technology...