Showing posts with label animation. Show all posts

Monday, July 13, 2009

Two woolly monsters emigrate to Hawaii...

Here are some photos of the two woolly monster puppets I made to send to John Hankins (castlegardener) as part of the international animation co-op. They are provisionally called 'Dad' and 'Toddler'. I'm afraid the lighting and focus in the photos is not great - I took them in a hurry under yellowish a light with no flash.

The Dad is a little smaller than my usual puppets, and is about 10 inches tall, the Toddler is tiny, just over 4 inches tall, and had to be made using miniature crochet with a 1mm hook.


Both puppets have aluminium armature wire and epoxy putty armatures which I wrapped with polyfibre wadding stuck in place with Copydex latex glue (one of the most versatile mediums in the world). The skins are made of hand crocheted yarn, acrylic and wool/acrylic blend in the case of the Dad puppet, and very fine angora/lambswool blend for the Toddler. The armature for the father had to be completed in stages after certain parts of the woolly skin had been sewn into place, otherwise the hands would have been too big to pass through the 'sleeves' of the skin.

The mouths are felt replacements, and other details are made using buttons and fluffy pom-poms. As usual I used french knitting (done on a circular four-pin bobbin) for Dad's fingers, which are threaded over latex and wool wrapped wire fingers.

Monday, May 18, 2009

More random props...

Just some more assorted props I've made for the international stop-motion co-op project. The measurements on the set-square are in inches.

Here is some tiny crocheted stuff. The blanket, pillow and cushion were made with a 1mm hook, the doily in the second photo was made with a 0.6mm hook. They took nearly as long to make as they would have done if they were full size because they contain almost the same number of stitches!

Here are a couple of rather contemporary looking stools I made. The seat cushions are hand crocheted and the bases are just frosted glass jars turned upside down:


Here is a tea-set. It's a bit too small for the scale of the rest of the set, so maybe it's an espresso set. I just used a 'Disney fairies' doll's china tea-set from the pound-shop, peeled off the fairy stickers and drew flowers on with Sharpie markers. I sealed the surface using an acrylic based varnish:


I also made a bowl of 'monster fruits' using a little glass sauce-dish and an assortment of glass and wooden beads with green neoprene stalks:


I'm off to London on Wednesday for 6 days, for a marathon of museum and art gallery visiting, and also to meet up with James Geard, director of 'Walter Gloom', to talk about film stuff.
I won't have any internet access, so I apologise in advance for not replying to any emails for a while.

Sunday, April 12, 2009

Props, cheap LEDs and fuzzy boobs!

I just thought I'd post some photos of various props I've made over the last few weeks. Most of them are for the international animation co-operative set up by John Hankins (castlegardener).

The first few are some wooden toys made from wooden bits and bobs I had in my hoard of useful junk:


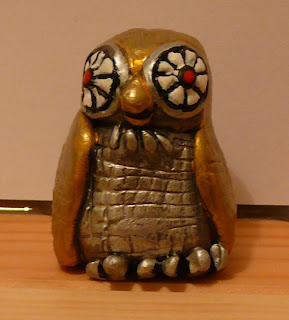
And this is my idea of what a Bubo (Clash of the Titans) bean-bag toy would look like. He's made of painted polymer clay:


And here's another silly stop-motion reference. Two plates with sheep on (ok, so I didn't 'make' them, I just drew on two plain doll's plates with Sharpie markers, then varnished them):


The other things I've been working on are some working table-lamps. I got an bargain on some ultra-bright LEDs in a variety of colours from a website called
http://www.phenoptix.co.uk/ who even sell blue and white LEDs for less than 14p each! That's ridiculously cheap, especially for those colours... I remember back when I was doing AS-level electronics in the late 90s, blue LEDs cost about £3 each and white LEDs hadn't even been invented... ahhhh, so long ago...

The website also sells great value resistors, which you need to prevent the LEDs being destroyed by the 9V circuits I wire them into. Great service too - if you need LEDs, I highly recommend them (they ship internationally too). The LEDs are really powerful (especially the white ones) and give a narrow 20 degree beam of light. They are so bright that I think I could probably use them as small spot-lights for lighting areas of my sets, which is great because they run for ages on a 9V circuit, they come in loads of colours, they don't flicker and they don't heat up!

Anyway, I used yellow LEDs in these two table lamps, to be placed in a sunny yellow coloured set. The lamps are made from glass beads and hollow wooden bases all glued together with epoxy. I soldered a 3mm yellow LED with a resistor into a circuit with a PP3 clip for a 9V battery, then covered all the exposed wires with heat-shrink tubing, with more heat-shrink over the top of that to turn the two seperate wires into one cable going from the lamp (the batteries will be hidden, obviously). I glued the LED into the bottom of the hole through the centre of the lamp, and put a 'plug' of tin foil fixed with epoxy into the hole at the top of the lamp to act as a reflector bouncing light back into the lamp.


I also made this lamp, to go in a set with a blue colour scheme, using a 3mm white LED. Most white LEDs give off a blue tinged light, and this one looks extra blue because of the blue glass in the lamp. It gives out about 3 times as much light as the yellow lamps, so I hope it won't be too overpowering!


Oh, and one last completely unrelated picture:


Yup, that's what woolly alien glamour model looks like, just in case you ever wondered...
It's for the cover of a magazine prop in 'Monday to Friday'.
If it arouses you (and you aren't a woolly alien yourself) you should probably be concerned!

Saturday, March 21, 2009

My other project - Walter Gloom

I've just started a new shared blog with writer/director/art director James Geard, which will document the production of a short film we are working on together - working title 'Walter Gloom'. At the moment James is working on the storyboards and designs, and I'll be starting work on the final sets and puppets in June when I've finished 'Monday to Friday'.


This project is completely different to my usual animations, and will give me a great opportunity to work with human puppets and also give me the experience of making someone elses ideas and designs come to life. To give you a taster, here is one of James' original character designs for Walter, the main character in the film:

And here is a photo of a prototype head I made for the puppet, to experiment with building up an old wrinkly face using liquid latex over a Fimo polymer clay head. I am currently experimenting with making replacement mouths and eyebrows for the puppet using Sculpey Bake & Bend clay, but to see more about that and more designs you'll have to follow the Walter Gloom blog!
Daz and I have just come back from London where I met up with James to discuss the film. We also visited as many museums and galleries as was humanly possible in the time we had, so we are now feeling exhausted but very content. I think if I lived closer to London I'd spend practically every day in the British Museum....

Unfortunately we ran out of time before we got to the Natural History Museum, so next time we go down I've promised Daz that the dinosaurs will take priority!

Monday, March 16, 2009

Finally, some alien industral set photos!

At last, here they are, some photos of my woolly monsters in their finished alien technology set, ready to animate! The photos were taken using my new FZ50 and you can click on them to see the BIG versions on flickr:

wide shot

monsters 1

monsters 3

green monster

jungle monsters

It's probably best not to ask what the heck is going on in the last photo!

Wednesday, October 22, 2008

I'm in the HAFFTube final 50!

HAFFTube is a web based competition being held as part of the Holland Animation Film Festival, where animators had to submit their youtube short films to be voted out by the public. I entered three, and now voting has ended and 'Grey Heights Guesthouse' is in the final top 50 (and is the shortest film in the running)! Woohoo!
You can see it by going to the first page of 'Favourites' on the HAFFTube site.

Now the 50 remaining animations will be judged by a panel made up of filmmakers selected for the main film festival. Keep your fingers crossed for me!

Sunday, October 19, 2008

Bacup Film Festival

Two of my 10 second long animations (the Teleporter one and the Grim Guesthouse one) are going to be shown at the Bacup Film Festival, one on the 24th and the other on the 25th of October. That means free film festival tickets for me and Daz! Thanks Steeeeeee!

In the unlikely event that anyone reading this blog is going to be in the Rossendale area of East Lancashire next weekend, come along to the Horse and Bamboo Theatre in Waterfoot on either night and see my 10 seconds of glory (and stay to watch lots of other interesting films of course).

The theatre it is being held at sounds really interesting, and has a big emphasis on puppetry and masks. I had never even heard of it before, but apparently it is quite famous.

Wednesday, October 1, 2008

Alien Technology - constructing my new set

My industrial looking alien set is almost finished - just a few details to add, a few wires to tidy up, then glue everything down and it's done. I'll be posting some good photos of the finished set very soon. Until then, here are some photos of how it was made and how it looks so far. Sorry about the horrid shiny flash lighting in the photos, I will light the photos of the finished set properly, I promise!

The set is the workplace of the two monsters I posted a photo of a while back. I've indulged a lot of my obsessions with this set - electronics, 'alien' alphabets, technological looking stuff...
My main inspirations for the design of the set are the spaceship interiors you see in science fiction (Star Trek, 2001: A Space Odyssey etc.). I've always loved the fact that there are so many important looking buttons and dials and lights and screens, yet none of them actually do anything - they are just designed to look important by the set designer.
The other visual influence on this project was 1950/60s machinery - the huge broken machines you find abandoned outside college metalwork departments, the disconnected 'mystery' boxes you find on the walls of school basements that once controlled heating systems that were removed decades ago... I think I just like machines which serve no purpose. Anyway, I've built one of my own.


Here is a photo of some, but not all, of the things I used to build this set (one or two things that I didn't use managed to sneak into this photo too).

The materials I used included: a sheet of MDF, a sheet of foamboard, woodscrews, lots of metal washers of assorted sizes, upholstery nails, flat wooden shapes with holes drilled round the edges (from the Arnold Basketry Kit!), those plastic cap things for covering the heads of screws in silver and white, brass rings, brass panel pins, brass picture turns, paper-mache craft boxes, old bits of meccano, different coloured electricians tape, lots of PVA glue, acrylic paint, sandpaper, some tubes from a duplo set (like big lego), nyloc nuts, a fine point Sharpie marker, LEDs (light emitting diodes) of different sizes and colours, lots of resistors of different values, heatshrink tubing, insulated wire, lead free solder, aluminium wire and probably quite a few things I've forgotten.....

So, er, yeah, lots of random stuff. Most of the fixings are available from any good hardware store and the electronics components I ordered from Maplin.

This shows some of the bits and bobs arranged on the piece of MDF that will become the back wall of the set so I could get an idea of how things should look. I then glued down all the bits I wanted to be painted with the background colour, using PVA glue. I used upholstery nails to look like rivets, wooden shapes too look like metal panels and metal washers to add detail. I also drilled a line of holes across the board where a row of LEDs will be.

Once the glued was dry, I painted over the entire background with a specially mixed 'steel' colour. I mixed two small pots of Games Workshop 'Boltgun Metal' paint with a large amount of cheap white craft acrylic paint and a little black and blue acrylic. This made the paint slightly metallic looking. I applied it using a sponge to avoid brushmarks.

The strip at the top is made using black and red electricians tape over the row of holes for the LED. I added details using washers and some plastic tile-spacers that I had already painted black. Everything was coated in a layer of PVA glue to protect it and make it shiny like metal (as opposed to the matte wood it is actually made of).

This is the floor of my set. I made it by sticking rectangular panels of sandpaper in a grid pattern with small gaps between them, onto a large piece of wood using PVA glue. I then painted the sandpaper with a mixture of PVA and grey acrylic. I used a darker grey acrylic to paint the 'grout' between the tiles, then before it dried I smudged it about with a sponge. I then used a large piece of bubble-wrap to print a spotty texture onto the tiles, first light grey paint, then dark grey - hopefully this texture will help to disguise tie-down holes. I then went over the grout again with a fine brush and a very dark grey paint.


If you look to the left of the photo there is a little black box with wires coming out of it and LEDs on the front. I used lots and lots of these in this project. They are made from those tiny brown paper-mache gift boxes you can buy in craft stores. I painted boxes and lids with acrylic paint then PVA to strengthen them. Then I poked little holes in the boxes with a pin so I could push the 'legs' of LEDs through. I also sometimes pushed resistors through to decorate the boxes. Then I wired up the LEDs.


This is what is inside the little boxes - messy but functional. I think made 12 of them in all. Some of the LEDs on the other side are not wired up - I cut the 'legs' of these LEDs and cover them in hot glue to hold them in place and insulate them (don't want to short out my circuits!). Then I solder the LEDs together in series with a resistor (the value of the resistor depends on the type and number of LEDs) being very careful not to burn a hole in the cardboard with the soldering iron. The wires are all colour coded so I know which terminal of the battery they need to go to. I will be running the LEDs in the set on three seperate 9V circuits.

Obvious Warning: if you are going to mess with electronics never use mains electricity, you'll end up killing yourself and/or burning your house down, and don't leave your creation switched on unattended in case it catches fire!


This is the front and back of the (almost) finished back panel of the set. Lots of LEDs, lots of buttons and lots and lots of wires... good job I quite enjoy soldering!


This is a front and back view of my console. It was made from a Christmas gift box and some upholstery nails. The buttons are all plastic screw-covers (with the backs snipped off) with symbols drawn on them with a fine marker, then covered in a thin layer of PVA to stop it rubbing off.
The 'big red button' is a safety nose for stuffed-toys!


This is roughly how it will all fit together - at the moment things are still propped up instead of glued in place and there are still loose wires and a few details missing, but you get the idea.


There will be photos of the finished set next time, along with close-ups of some of the details and descriptions of how I made them.

Until next time, have fun. Oh, and if you haven't already seen it, watch Michel Gondry's 'The Science of Sleep' - cardboard stop-motion cities, celophane water, tin-foil time machines and huge hands - brilliant film in my opinion.

Monday, September 15, 2008

Castlegardener's Poetree and other updates

Back again after another week of not being able to do much due to back pain...grrrrr. It means that the short I'm working on wasn't finished for the Bristol short film festival deadline and probably won't be finished for the Bacup film festival. Oh well, shit happens.
The short I'm working on is going to be the first of five episodes of a series, so I might pitch it as a pilot to 4mations and see if I can get some money to make the other four episodes. It's worth a try anyway!

Anyway, onto the most important news: A couple of weeks ago Castlegardener (aka John Hankins) finished working on a fantastic animation called 'Poe-Tree'. If you haven't already seen it, go and watch it now on his youtube channel: http://www.youtube.com/watch?v=aIqoCLQZQIk
It's John's first lip-sync animation and I love it! The woolly ent puppet is one of my creations and I sent it to John in Hawaii along with lots of replacement mouths, so I think he felt obliged to do some lip-sync with it. The voice for the ent is Oregon based animator Don Carlson (Pram Maven).
What more could you want in an animation - a very dramatic poetry-reading tree, Edgar Allan Poe, a brilliant raven puppet and John's incredibly expressive animation!

My woolly creations have also been popping up in other far-flung places recently... check out the bouncing finger puppets on Canadian animator Emmyymme's (Emily Baxter's) blog: http://emmyymme.blogspot.com/2008/08/manfrotto.html
and Shelley Noble, who is working on her film 'Halfland' in California, has received the 'woolly glove fish' (or Doug to his friends) and the shoal of 'alphabafish' I made for her. There are a couple of test shots of them at the end of this post on her blog:
http://notesfromhalfland.blogspot.com/2008/08/aint-no-mountain-high-enough-and.html

The monsters are taking over!

Next post: how to make a high-tech industrial alien looking set out of MDF, cardbord, junk, electronic components and stuff from the hardware store....

Monday, August 18, 2008

New woolly monster puppets

Woohoo! I'm back in action after a week incapacitated by back pain. I managed to put my back out whilst I was asleep (no, I don't understand it either) and spent days unable to do anything but sit upright and perfectly still or lie flat and perfectly still - really useful. Thankfully I am now feeling much better although still a little delicate. It's slowed down my schedule a lot though, which is a shame.

Here are the two puppets for my next animation. Unfortunately Steeee isn't going to be able to write a script for me due to being a very busy man (no seriously, I don't know when he finds time to sleep). I have come up with an ingenious idea for the script (or lack thereof) myself. It will all become apparent when you see the animation...

Anyway, puppets:


Woolly monsters - my speciality. They are hand crocheted and have wire armatures. The purple one is made from a purple acrylic yarn crocheted together with magenta mohair so it has a fuzzy surface. The nature of fuzzy surfaces when animated is going to be used as a feature in this monster. The blue details are a mixture of acrylic and fuzzy polyester yarn. The green monster is a combination of bright green and mustard coloured acrylic yarns and a grassy green acrylic wool blend. The eyes are made of uncovered white plastic self-cover buttons (the ones that are designed to be covered with fabric) and the locking disks on the back of them can be used to secure the eyes in place. The pupils are black buttons attached with white-tack so they can be moved around. I have not made the replacement mouths yet, but they will be felt donut mouths.

Here are some photos of how they were made. First I crocheted the skin of the monsters. I find it easiest to make the skin first, then make the armature to fit. Each monster was crocheted as four sections: the head/body, a trouser shaped section and two arms. After I'd made the skin, I placed the segments together, drew round them and made an armature from aluminium arnature wire and epoxy putty to fit the shape, leaving plenty of room for padding. I didn't add hands to the armature at this point so that I could still thread the arm wires through the skin. The feet have flange-nuts inside the epoxy putty to act as tie-downs.


I padded the armatures with polyester wadding, usually used in quilting, glued to the wire with Copydex (latex adhesive) and fixed in place with fabric strapping, usually used in first aid.


Then I 'dressed' the monsters in their skins adding extra stuffing where needed, then added hands made of epoxy putty and wire. I wrapped the wire fingers and the wire antenna in Copydex and yarn to make them thicker and rubbery. I threaded short lengths of french knitting onto the fingers and this grips to the rubbery surface to stop it sliding around. Then I finished sewing on the arms.

Now I just have to make the mouths then on to building the set - expect excessive use of LEDs, resistors and pretend alien technology...